

What I love so much about the Montessori Method is the approach to raising independent children and the floor bed was a natural transition for us when the time came. Here’s our experience.
Why a Montessori Floor Bed?
Soon after my motherhood journey commenced, I started to listen to The Montessori Baby by Simone Davies on Audible. This wonderful book was such an eye opener to me that we adopted MANY of the approach in parenting and raising our daughter. One of the things we love so much about the Montessori method is respecting the child and seeing them as a true human being with feelings and all and the independence aspect which is why we chose to transition our daughter to a floor bed
Benefits of a floor bed
When we transitioned our daughter to her floor bed at six months of age, she wasn’t rolling in bed yet and we felt very comfortable placing her in the new floor bed, especially whilst being able to view her 24/7 on the baby monitor (which has face covering alert and rollover alert directly to your phone or watch). We’ve tried and tested our floor bed for a few months now and here’s what we love about it:
- Very easy to soothe baby during night wakes, you just lay besides bub to settle them or breastfeed or co sleep if you desire.
- Once baby gets to an age where she will be crawling, she will be able to crawl out of bed by herself, without having to cry for help (like she would have in a cot for example).
What does a Montessori Floor Bed Setup Look Like for 6 Month Old Baby?
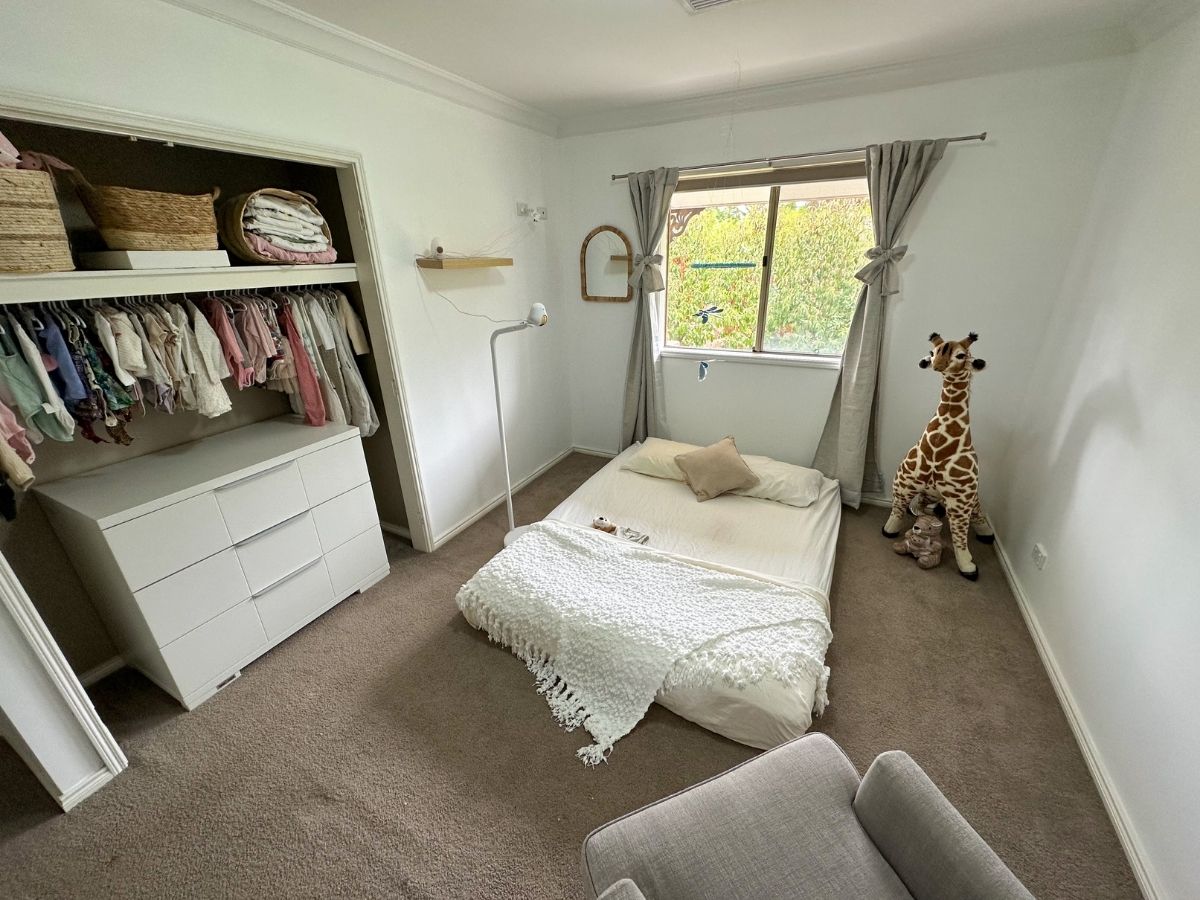
In our room we have setup the following:
- Queen sized floor bed – my own mattress was recently upgraded so we decided to not purchase a ‘new’ or ‘child sized’ mattress for our daughter. Instead we chose to put this mattress to landfill, and place it in our daughters room instead. We have put pool noodles either side underneath the fitted sheet, to act as a barrier, preventing her from rolling over in bed once she gets the hang of it. This does not stop her from rolling or potentially falling out of bed, however rolling uphill against something is much harder than rolling on a flat surface. We also have a tuck sheet to tuck baby tightly into, once she’s in bed in her arms out sleeping bag. This snug feeling may help some babies with getting to sleep and staying asleep.
- CuboAI Camera – we love this camera so much we’re glad we spent the money. It wasn’t a cheap camera option but it meets all our needs, from newborn to now 6 months later, we’re still using it and using the different setups as required. This camera comes with a crib attachment, a floor stand and a stand alone option. We’re currently using the floor stand option.
- Feeding glider chair – This was probably the best buy of all! Loved this chair since week 4 of having our daughter and it’s been a back saver for all those night feeds. Very comfy and easy to clean. Wonderful footrest but you have to put some hard work into it to close the footrest with your feet (this can be tough after having had a Caesar as your core muscles aren’t as functional still quite tender).

How to transition from cot / bassinet to floor bed
- Our baby slept in our room for the first 6 months and at this age was very much ready for her own room. During the day we spent some extra time in her room to get her used to it. I would place her on this bed and read a book or just lay down and spend time.
- Our baby slept and still sleeps with Raffy which was gifted to us, and this has been a godsent! She absolutely LOVES Raffy and cuddles up at night, mostly she likes sleeping with raffy on her face. So needless to say, bedtime is associated with Raffy so we made sure to have Raffy with us when introducing her to the new bed.
- We let our daughter have a daytime nap in the new bed to get her used to it and slowly she transitioned to having both naps in this bed, and then we tried it at night, she loved the space!!!
- We made the floor bed a bit more “secure” by placing a pool noodle either side underneath the tucksheet as mentioned earlier, and we also enclosed the sleeping space with firm pillows to make it a bit like a nest. Our daughter loved feeling something next to her so we place a pillow above her and beside her so she felt comfy.
Where to place the Montessori floor bed?
When we were designing our room we weren’t quite sure where to place the floor bed. Ideally:
- Away from power points and cords / cables / trip hazards
- Away from things that could potentially fall on baby
- Away from direct heating / cooling / air flow

Tips for your Montessori floor bed
- Do whatever feels good for you and your family. There’s no rules, as long as bubs is safe and comfortable that’s all that matters
- Do some research. Find your inspiration on Pinterest, google, or social media and design a floor bed setup that works for you.
- Be prepared to change it up. As you start using the floor bed, you’ll soon learn what works and what doesn’t work and you’ll make some changes as required. You may change up the camera angle, the entire setup or location of the bed.
- Use white bed sheets which is much better to see at night on the camera with night view. That way you can easily see whether there’s vomit or a spider on the bed or whatever else. I used a dark sheet once on wash day, and noticed it was very hard to see what was going on, so I immediately changed to a white sheet which helped me keep track of dirt or fluff in the bed and take care of it.
In Summary
Transitioning to a floorbed has been a natural and easy progression for our family and we find it so easy to sooth bub at night or even breastfeed or co sleep. We can’t wait for this journey to unfold and share with you our next step!



Comments are closed.