

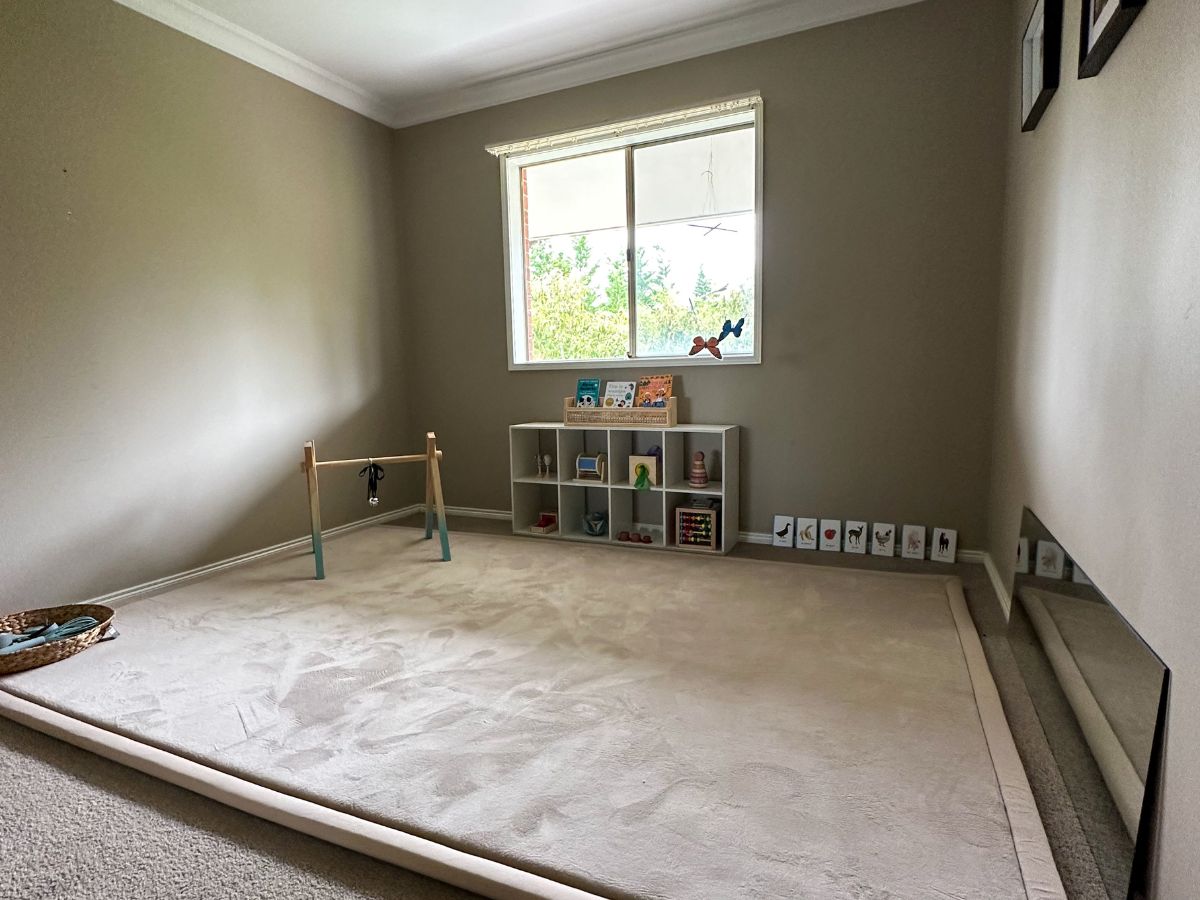
The Montessori Method really aligns with our vision and values for raising an independent critical thinker, and with that method in mind, we have setup our babies’ playroom / movement area.
Freedom to Move
One of the most important aspects of the this area is “freedom to move”. This gives our little one the area/space to freely and independently move around. The space is setup in a way that encourages movement with interesting things / toys / activities setup on the edges of a movement mat, encouraging our little one to move towards those things.
The Prepared Environment
The movement area is setup in a specific way, in the Montessori Method this is called the “prepared environment”. There are Six Principles of the Prepared Environment:
- Freedom.
- Structure and Order.
- Beauty.
- Nature and Reality.
- Social Environment.
- Intellectual Environment.
In layman’s terms, it is that we have setup the movement area in a way that is beautiful, safe, age appropriate and stimulating for our little one, with freedom to move around without obstacles that may limit these principles.
Regular change to the environment
The movement area gets a regular makeover with various toys, learning materials and activities, as the needs of our daughter change constantly. From the very first months where there is minimal stimuli and moving around, the the three and fourth month mark where we introduced the bell on a ribbon, after which we introduced nature inspired mobiles from 4 months onwards.
Following The Child’s Lead
Another aspect of the Montessori method is to follow the child’s lead. This means to observe the child, and noting down where they’re at developmentally. Each child is their own person and develops new skills and interests at their own pace. For this reason we observe our baby on a regular basis (with monthly observations noted in her journal) and make a change to the environment, as to help her develop and offer what she is showing an interest in, whether that’s animals, musical toys, timber toys or household items.
Our Movement Area Setup
Here’s how we have setup our babies’ movement / play area Montessori Style. So here’s what we’ve done for the 6 month movement area / playroom setup:
- Montessori style shelves – you can purchase special “Montessori” shelves but we’ve made do with what we had. Which works perfectly fine as you can see in the pictures below. We’ve used a cube storage and placed it sideways, and filled each cubicle with 1 activity. This way the child learns that each thing/toy has its place, and at the same time the activities are neatly organised, without too much overload/stimuli. At a later age, this teaches the child to choose from a few options (versus just a basket full of toys which is hard to see). This neat organised shelf gives structure and order to the room.
- Muscle Mat movement mat – we previously had two rugs on top of each other but now we have a dedicated, soft and thick movement mat which is easy to clean and perfect for our movement area. This mat is the foundation of our area.
- Home Made Butterfly Mobile – I found this wonderful website which offers a free printable to make your very own Montessori butterfly mobile. This mobile has realistic images which another principle we LOVE about Montessori. This way the child gets to learn and relate to real life images.
- Mirror – since the very early months we have incorporated the mirror in the movement area, giving our baby the opportunity to look at themselves.
- Nomenclature Cards – In our home we speak two languages, using the OPOL Method (One Parent, One Language) and therefore we have incorporated Dutch Nomenclature cards. These are learning card with images and words. You can easily make your own cards using a printer and laminator (you can buy my Dutch and English Colours and Fruit and Vegetable Cards here)
- Forward facing book shelf – having books facing forward makes it easy for the child to view the front of the book, and in turn making it easier to understand what the book is about (versus when you only see the spine it is a very small area to read and does not really give the child many clues as to what the book is about, especially at a young age when they don’t understand the words yet). So we made do with what we already had, which is a ratan hanging bookshelf from Kmart. We use this to display a small number of books, which allows the child to pick and choose what they want to read. This in turn teaches the child the choose / make decisions.
- Bell on a ribbon – this was a wonderful activity that our daughter LOVED around the age of 3.5/4 months when she started to discover her legs and feet. We used the timber baby gym to suspend the bell on a ribbon at various heights. At times we used it at a higher level for our daughter to learn to “grasp” the bell. Other times we lowered the bell and had it suspended over her feet, giving her the opportunity to kick the bell and explore cause and effect (if I move my leg against the bell, the bell makes a sound).





Comments are closed.